
The Doodle Insights #2 and #3 were both about procedural dithering. It is much recommended to take a look at them before reading this third part on procedural dithering.
In part 1 we saw the basics of procedural dithering and in part 2 we saw how to make it more practical. This part 3 will be the last one on the subject of procedural dithering.
And for this last part, we’re gonna see specific but easy uses of the Procedural Dithering, with a bunch of code snippets! Our main subjects will be shapes and how to handle the mathematics and then cellular automata!
By now, you know that procedural dithering is done by selecting random pixels on the screen and coloring their neighbors with the colors that the selected pixels should have. We also saw in the first part that one of the common ways to figure out that color was maths. The example we gave then was the one with the colorful lines and its formula just under. It was a very simple example, so here’s a slightly more complicated one with circles:

Now if I wanted to do this effect of circles that get bigger without procedural dithering, I’d have to figure out the drawing order of the circles, what circle is what color, there’d be maths and syncing and it’d be terrible. Here I only have to ask myself one question: what’s a circle?
A full circle (a disc, really) is all the points being at a maximal distance of R from the point O. R is the ray of the circle and O is the center. Now we want our infinite layering of circles which all have the same center, so how do you find out what color any pixel is? You calculate the length from that pixel to the center and you get which circle that would be. Make your circles only with maths and the notion of circle is nothing more than an abstract concept.
But we can make it better. What if I want my circles to use only a few of the Pico-8 colors? Let’s just use an array! Since the Pico-8 colors work through indexing anyway (colors are not defined by color codes but by their index in the Pico-8 palette), we can just add a layer of indexing with something like: ‘plt={4,9,10,9}’ and then ‘idx=flr(d/16-t*4)%#plt+1’ and ‘c=plt[idx]’.

Let’s push it a bit further by having two arrays of colors and let the algorithm randomly choose one for each pixel. Here the two arrays are: plta={4,9,10} pltb={2,4,9}

Ok this is a bit much but it still works pretty well! Here is the full code for this last version!
t=0
plta={4,9,10}
pltb={2,4,9}

function _draw()
 t+=0.01
 for i=0,999 do
  x=rnd(128)
  y=rnd(128)
  d=sqrt(sqr(x-64)+sqr(y-64))
  idx=flr(d/16-t*4)%#plta+1

  if rnd(2)>1 then
   c=plta[idx]
  else
   c=pltb[idx]
  end

  circ(x,y,1,c)
 end
end
We got a bit off the point but remember the first step of this tiny doodle. A circle is just a simple rule that all its points have to be at a restricted distance of its center. Most shapes can be seen like this, as one or a combination of simple rules. And if you are in doubt on how to do a shape, just google it! You’ll find the information you need in just a few minutes!
Here’s one of my earliest doodles:

The area containing the eye is defined as the area appertaining to two big circles, one centered on the top of the screen and one on the bottom. If we are in that area, we check whether or not we’re in the iris. Note that the iris moves. Its center is defined by an x and a y variables and is being moved by the player. That’s it. So all we have to do is check for the distance between our random pixel and the center of the iris. If we’re there, we might as well just check if we’re near enough to be in the pupil.
Simple shapes and in particular circles, appearing with procedural dithering are great for backgrounds. Each of the five games of the Pixel Session Vol.1 pack has a similarly defined background. And here is the doodle that inspired the tiny doodle from above!
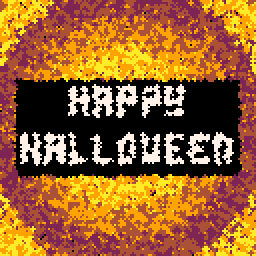
It’s a bit sinister but it was halloween!
You can also make radial rays by using ‘atan2(x-64,y-64)’ to get the vector angle of your random pixels from the center, then make the color depend on that angle. Then turn it into a spirale by also calculating the distance between the random pixels and the center and add that to the color value!
These operations can become costly, especially when using trigonometry and square roots, so remember the tips on optimization from the Doodle Insights #3: try processing fewer pixels each frame and try different coloring methods!
Alternatively you can use the second-surface method, by drawing simple shapes and then using ‘memcpy()’ to put them on the sprite sheet and use that sprite-sheet as a map for your dithering from then on. This has obvious drawbacks though, as you can only use it for static shapes and more complex shapes will require more complex operations. Still, it can be very useful to animate things like these generated trees:

In part 1 on Procedural Dithering, we saw there were three main ways of doing procedural dithering. But we barely looked at the third one since then, so let’s take a look at cellular automata!
Disclaimer: I’m stretching the definition of cellular automata here. To me, cellular automata is about taking cells on the screen and make their state depend on other informations from the screen. And here we’re gonna go from the information, to the cells.
The idea here is to take random pixels as usual and then, get a color from that pixel’s color. Example!
Here, the rules are:
c=pget(x,y)
if c>0 and rnd(4)<1 then
 c+=1
end
circ(x,y,1,c)
We get the color of our random pixel and if it’s not black, we randomly increment it. (after we get to the color 15, it automatically loops back to the color 0, black) Then, we draw that color on its immediate neighbors using ‘circ(x,y,1,c)’. This particular example looks very cool as a background to an effect drawn as white on black.
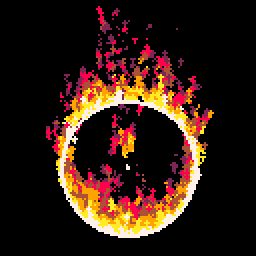
But again we can go much further with this idea! First, we could use an array of selected colors instead of depending on the regular indexation. But we could also offset the drawing 2 pixels up and then… we have flames!
But we could also change the drawing to a sprite or a symbol and make it depend on the color of the random pixels. On this next doodle, a heart-symbol is drawn when the color found is 2,8 or 14, but when it’s 7 (white), it only does a ‘circ(x,y,1,7)’.

Again, you can move away from actual dithering pretty fast with this but that’s what makes it interesting. Here is an example that is much further into the idea of cellular automata. The drawn colors depend not only on the random selected pixels, but also on their neighbors. By analyzing the structure formed by a pixel and its neighbors, we can try to continue this structure in our drawing!

If you want to use your procedural dithering to produce strange but beautiful effects, cellular automata is the way to go. Practicing by making your own algorithms and constantly modifying them will make you better at it.
With procedural dithering, shapes can be formed by using simple mathematical rules and ‘living’ effects can be produced by using cellular automata!
And this is the conclusion of this final part about procedural dithering! I hope you found it interesting!
Some of the doodles presented here can be downloaded for free on itch.io and played directly on the Pico-8 BBS! The others (#46+) can be downloaded by patrons of the ‘Pico-8 Lover’ tier on the Patreon!
I’m not sure what will be the subject of the next Doodle Insights but candidates are: the best ways to modify an effects’ colors, or maybe procedural scene/object generation. (if I choose the latter, I will probably do it in two parts) Either way, it should be out on next Tuesday!
If you have any questions, remarks or suggestions, please put them on the Patreon post, thank you!
These Doodle Insights are here thanks to the awesome people supporting it on Patreon! Here are their names!
Joseph White, Adam M. Smith, Matthew, Tim and Alexandra, berkfrei, Nick Hughes, Christopher Mayfield, Jearl, Dave Hoffman, Thomas Wright, Morgan Jensen, Zach Bracken, Anne Le Clech, Flo Devaux, Emerson Smith, vaporstack, Dzozef, Cole Smith, Jared Butowsky, Tony Sarkees and Justin TerAvest!
Have fun with the procedural dithering!
TRASEVOL_DOG
